Build a Server Quickly from Scratch
Introduction
In this section, you can quickly build a complete game server. It covers:
- Writing a logic server
- Writing Actions
- Simulating client requests
- Packaging and running as a JAR
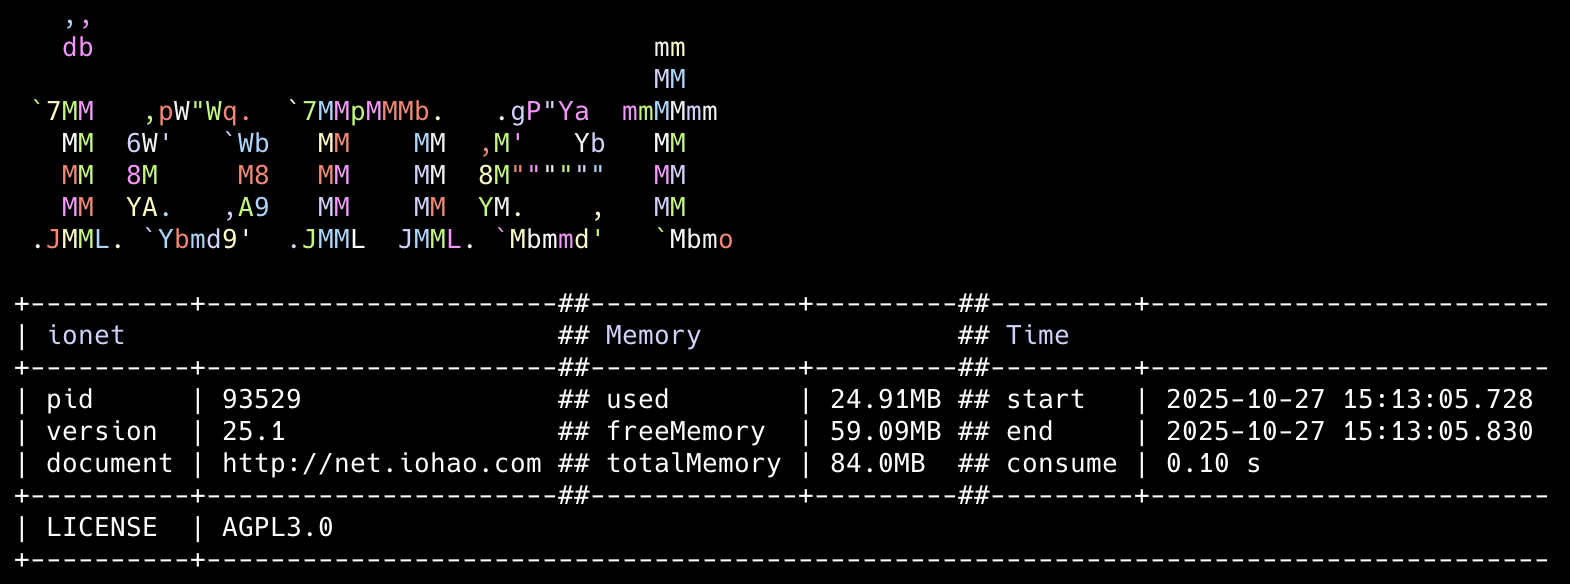
Launch Snapshot
The framework also performs well in memory usage, startup speed, and package size.
- Memory: low footprint.
- Packaging: about 15MB after building the JAR.
- Startup speed: applications typically start in 0.x seconds.
Example Source Code
See https://github.com/iohao/ionet-examples
Path:
ionet-quick-demo
DemoApplication.java: server startup classDemoClient.java: simulated client startup class
Build and run as JAR
Run the command below. A ionet-quick-demo.jar file will be generated under target.
This JAR can run independently, and the packaged size is about 15MB.
mvn clean package
Start the JAR
Run the command below in the demo project. The server usually starts within 0.x seconds.
java \
--add-opens java.base/jdk.internal.misc=ALL-UNNAMED \
--enable-native-access=ALL-UNNAMED \
-jar target/ionet-quick-demo.jar
After downloading the example source code, follow this document step by step.
Configure pom.xml
After creating a new project, add the following to pom.xml.
In the current sample project this is already configured; you can run directly.

<properties>
    <java.version>25</java.version>
    <!-- see https://central.sonatype.com/artifact/com.iohao.net/run-one -->
    <ionet.version>xx.xx</ionet.version>
</properties>

<dependencies>
    <dependency>
        <groupId>com.iohao.net</groupId>
        <artifactId>run-one</artifactId>
        <version>${ionet.version}</version>
    </dependency>
</dependencies>
Define Business Data Protocol
Now we define the data protocol used for client-server data interaction. If your background is mainly web development and not game server development, you can think of this as DTO/business data carriers used for data transport.
Since native PB can be relatively cumbersome to use, we use JProtobuf here. It simplifies PB usage while keeping performance equivalent to native PB.
Adding the ProtobufClass annotation to a regular Java class means it is a business data protocol object.
@ProtobufClass
public class HelloMessage {
    public String name;

    @Override
    public String toString() {
        return "HelloMessage{name='"+ name  + "'}";
    }
}
Logic Server
A Logic Server needs to implement the LogicServer interface.
Two methods must be implemented:
settingBarSkeletonBuilder: configure the business framework for the current logic server.settingServerBuilder: configure metadata for the current logic server.
- code 5: scan the package where action classes are located. The framework scans all classes under the current package and sub-packages. No matter how many action classes you have, configuring any one class from that package is enough.
- code 7: add the console output plugin.
- code 12: set the logic server name.
public class DemoLogicServer implements LogicServer {
    @Override
    public void settingBarSkeletonBuilder(BarSkeletonBuilder builder) {
        // Scan the package where the action classes are located
        builder.scanActionPackage(DemoAction.class);
        // Add console output plugin
        builder.addInOut(new DebugInOut());
    }

    @Override
    public void settingServerBuilder(ServerBuilder builder) {
        builder.setName("DemoLogicServer");
    }
}
Now the logic server is done. Next, write a business handler class. In practice, most of your time is spent writing business logic.
Error Codes and Exceptions
Assertion + Exception mechanism = clear and concise code
The business framework supports exception handling, which makes business code cleaner. This is also why it has near-zero learning cost (an ordinary Java method can be a business action).
If a business exception occurs, throw it directly. Developers do not need extra handling. The framework knows how to process the exception, and thrown business exceptions are always returned to the requester.
We usually use an enum to manage error codes.
The enum needs to implement the framework ErrorInformation interface.
public enum ErrorCode implements ErrorInformation {
    nameChecked(100, "The name must be Jackson");

    final int code;
    final String message;

    ErrorCode(int code, String message) {
        this.code = code;
        this.message = message;
    }

    @Override
    public String getMessage() {
        return this.message;
    }

    @Override
    public int getCode() {
        return this.code;
    }
}
Write Actions
@ActionController(DemoCmd.cmd)
public class DemoAction {
    @ActionMethod(DemoCmd.here)
    private HelloMessage here(HelloMessage helloMessage) {
        HelloMessage newHelloMessage = new HelloMessage();
        newHelloMessage.name = helloMessage.name + ", I'm here";
        return newHelloMessage;
    }

    @ActionMethod(DemoCmd.jackson)
    private HelloMessage jackson(HelloMessage helloMessage) {
        // Example exception mechanism demonstration
        // cn: 示例 异常机制演示
        ErrorCode.nameChecked.assertTrue("Jackson".equals(helloMessage.name));

        helloMessage.name = "Hello, " + helloMessage.name;
        return helloMessage;
    }

    @ActionMethod(DemoCmd.list)
    private List<HelloMessage> list() {
        // Get a List data and return it to the request client
        // cn: 得到一个 List 列表数据,并返回给请求端
        return IntStream.range(1, 5).mapToObj(id -> {
            HelloMessage helloMessage = new HelloMessage();
            helloMessage.name = "data:" + id;
            return helloMessage;
        }).toList();
    }

    @ActionMethod(DemoCmd.triggerBroadcast)
    private void triggerBroadcast() {
        var communication = CommunicationKit.getCommunication();

        // broadcast object
        var message1 = new HelloMessage();
        message1.name = "name-1";
        communication.broadcastMulticast(DemoCmd.listenData, message1);

        // broadcast list
        var message2 = new HelloMessage();
        message2.name = "name-2";
        communication.broadcastMulticast(DemoCmd.listenList, List.of(message1, message2));
    }
}

public interface DemoCmd {
    int cmd = 1;

    int here = 0;
    int jackson = 1;
    int list = 2;
    int triggerBroadcast = 3;

    AtomicInteger broadcastIndex = new AtomicInteger(20);
    CmdInfo listenData = CmdInfo.of(cmd, broadcastIndex.getAndIncrement());
    CmdInfo listenList = CmdInfo.of(cmd, broadcastIndex.getAndIncrement());
}
We defined 4 methods in this class. These business methods are called actions. A business method represents one action in the framework, which means we now have 4 actions for business processing.
Both the business class and methods define routes, and each route is the unique access path of that action. Route-based access improves modularization.
What each action does:
1-0: returns a single business object to requester1-1: exception mechanism demo; when assertion fails, framework returns error code to requester1-2: returns List business data to requester1-3: triggers broadcast and sends business data to clients (users)
In the actions above, parameters and return values are objects.
The framework also supports primitive parameters/returns, such as int, long, boolean, and String.
The framework calls this automatic boxing/unboxing for business parameters.
Start the Server
The external server port is 10100, used by real users to connect.
public class DemoApplication {
    static void main() {
        // Enable source documentation parsing to display code line numbers.
        // cn: 开启源码文档解析,以显示代码行数。
        CoreGlobalConfig.setting.parseDoc = true;
        CoreGlobalConfig.setting.print = true;
        // i18n: US or CHINA
        Locale.setDefault(Locale.CHINA);

        // Create the ExternalServer builder and set the port for establishing connections with real players
        // cn: 创建对外服构建器,并设置与真实玩家建立连接的端口
        int port = ExternalGlobalConfig.externalPort;
        var externalServer = ExternalMapper.builder(port).build();

        // Create an EmbeddedAeronRuntime instance and get the Aeron instance
        // cn: 创建 EmbeddedAeronRuntime 实例并获取 Aeron 实例
        var aeron = new EmbeddedAeronRuntime().getAeron();

        new RunOne()
                // aeron
                .setAeron(aeron)
                .enableCenterServer()
                // externalServer. cn: 对外服
                .setExternalServer(externalServer)
                // logicServers. cn: 逻辑服
                .setLogicServerList(List.of(new DemoLogicServer()))
                .startup();
    }
}

// see https://github.com/iohao/ionet-examples/blob/main/ionet-quick-demo/src/main/java/com/iohao/example/quick/EmbeddedAeronRuntime.java
public class EmbeddedAeronRuntime {
...
}
When starting, add VM options for DemoApplication:
--add-opens java.base/jdk.internal.misc=ALL-UNNAMED
--enable-native-access=ALL-UNNAMED
Next, we will write a simulated game frontend connection (simulated real users) to access our game server.
Before writing simulation code, let us first look at the game server startup console.
Startup Console Output Explanation (Important)
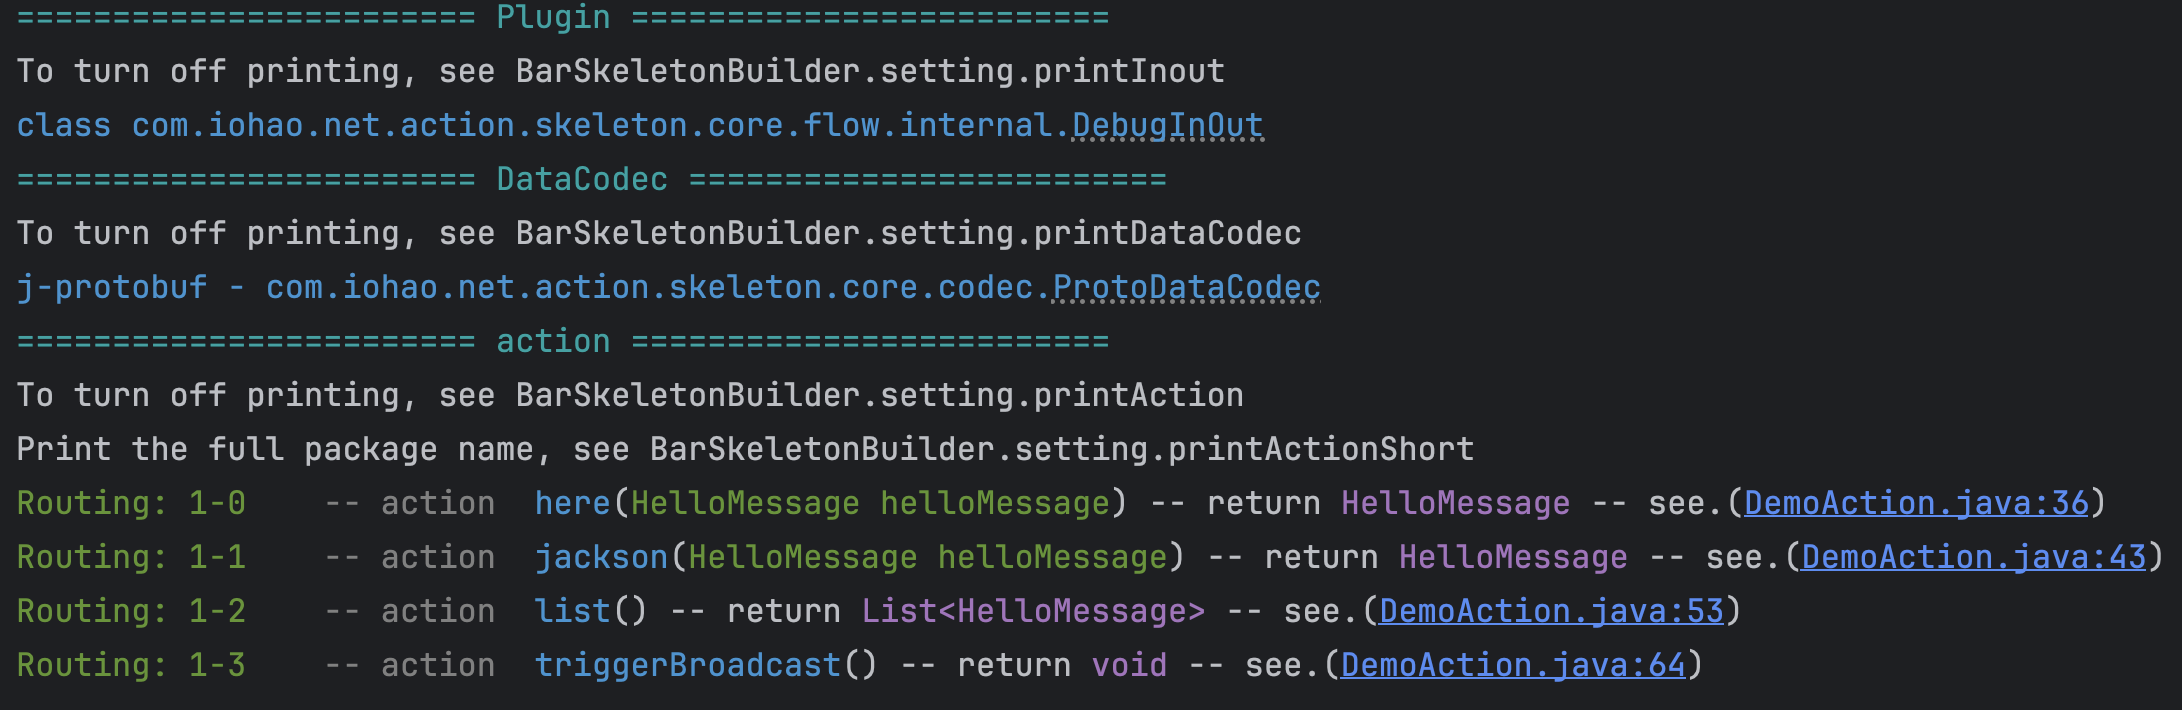
When the server starts, you can see the action methods defined earlier. From startup output, you can know how many actions are defined and where each action is located. This information is very practical. Without it, in medium-to-large projects, finding business methods written by yourself or others is difficult.
In the console, you can see each action's route, class, business method, method parameters, return value, and source code line number.
In your IDE, click DemoAction.java:43 in console output,
and you can jump directly to that code (fast navigation), which is an excellent development experience.
Simulate Client Requests
We use the framework pressure test & simulated client request module to test the actions we wrote.
Add the simulated client request module to pom.xml:
<dependency>
    <groupId>com.iohao.net</groupId>
    <artifactId>extension-client</artifactId>
    <version>${ionet.version}</version>
</dependency>
Write Simulated Client
In DemoRegion, we wrote 4 simulated requests and 2 broadcast listeners.
You can trigger these simulated requests from console later.
In DemoClient, we load the simulated request region (DemoRegion) we just wrote.
By default, ClientRunOne connects to external server port 10100.
public class DemoClient {
    static void main() {
        // US or CHINA
        Locale.setDefault(Locale.CHINA);

        // closeLog. cn: 关闭模拟请求相关日志
        ClientUserConfigs.closeLog();
        // Startup Client. cn: 启动模拟客户端
        new ClientRunOne()
                .setInputCommandRegions(List.of(new DemoRegion()))
                .startup();
    }

    static class DemoRegion extends AbstractInputCommandRegion {
        static final Logger log = LoggerFactory.getLogger(DemoRegion.class);

        @Override
        public void initInputCommand() {
            // Setting cmd. cn:设置主路由
            this.setCmd(DemoCmd.cmd, "TestDemo");

            // ---------------- request 1-0 ----------------
            ofCommand(DemoCmd.here).setTitle("here").setRequestData(() -> {
                HelloMessage helloMessage = new HelloMessage();
                helloMessage.name = "1";
                return helloMessage;
            }).callback(result -> {
                HelloMessage value = result.getValue(HelloMessage.class);
                log.info("{}", value);
            });

            // ---------------- request 1-1 ----------------
            ofCommand(DemoCmd.jackson).setTitle("Jackson").setRequestData(() -> {
                HelloMessage helloMessage = new HelloMessage();
                helloMessage.name = "1";
                return helloMessage;
            }).callback(result -> {
                // We won't get in here because an exception happened.
                // The logic for action 1-1 requires the name to be "Jackson".
                // cn: 不会进入到这里,因为发生了异常。 1-1 action 的逻辑要求 name 必须是 Jackson。
                HelloMessage value = result.getValue(HelloMessage.class);
                log.info("{}", value);
            });

            // ---------------- request 1-2 ----------------
            ofCommand(DemoCmd.list).setTitle("list").callback(result -> {
                // We get list data because the server returns a List
                // cn: 得到 list 数据,因为服务器返回的是 List
                List<HelloMessage> list = result.listValue(HelloMessage.class);
                log.info("{}", list);
            });

            // ---------------- request 1-3 ----------------
            ofCommand(DemoCmd.triggerBroadcast).setTitle("triggerBroadcast");

            // ---------------- Broadcast Listener. cn: 广播监听 ----------------
            ofListen(result -> {
                HelloMessage value = result.getValue(HelloMessage.class);
                log.info("{}", value);
            }, DemoCmd.listenData, "listenData");

            ofListen(result -> {
                List<HelloMessage> helloMessageList = result.listValue(HelloMessage.class);
                log.info("{}", helloMessageList);
            }, DemoCmd.listenList, "listenList");
        }
    }
}
Simulated Client Console
When we input . in the simulated client console, it lists the simulated request data we wrote earlier.
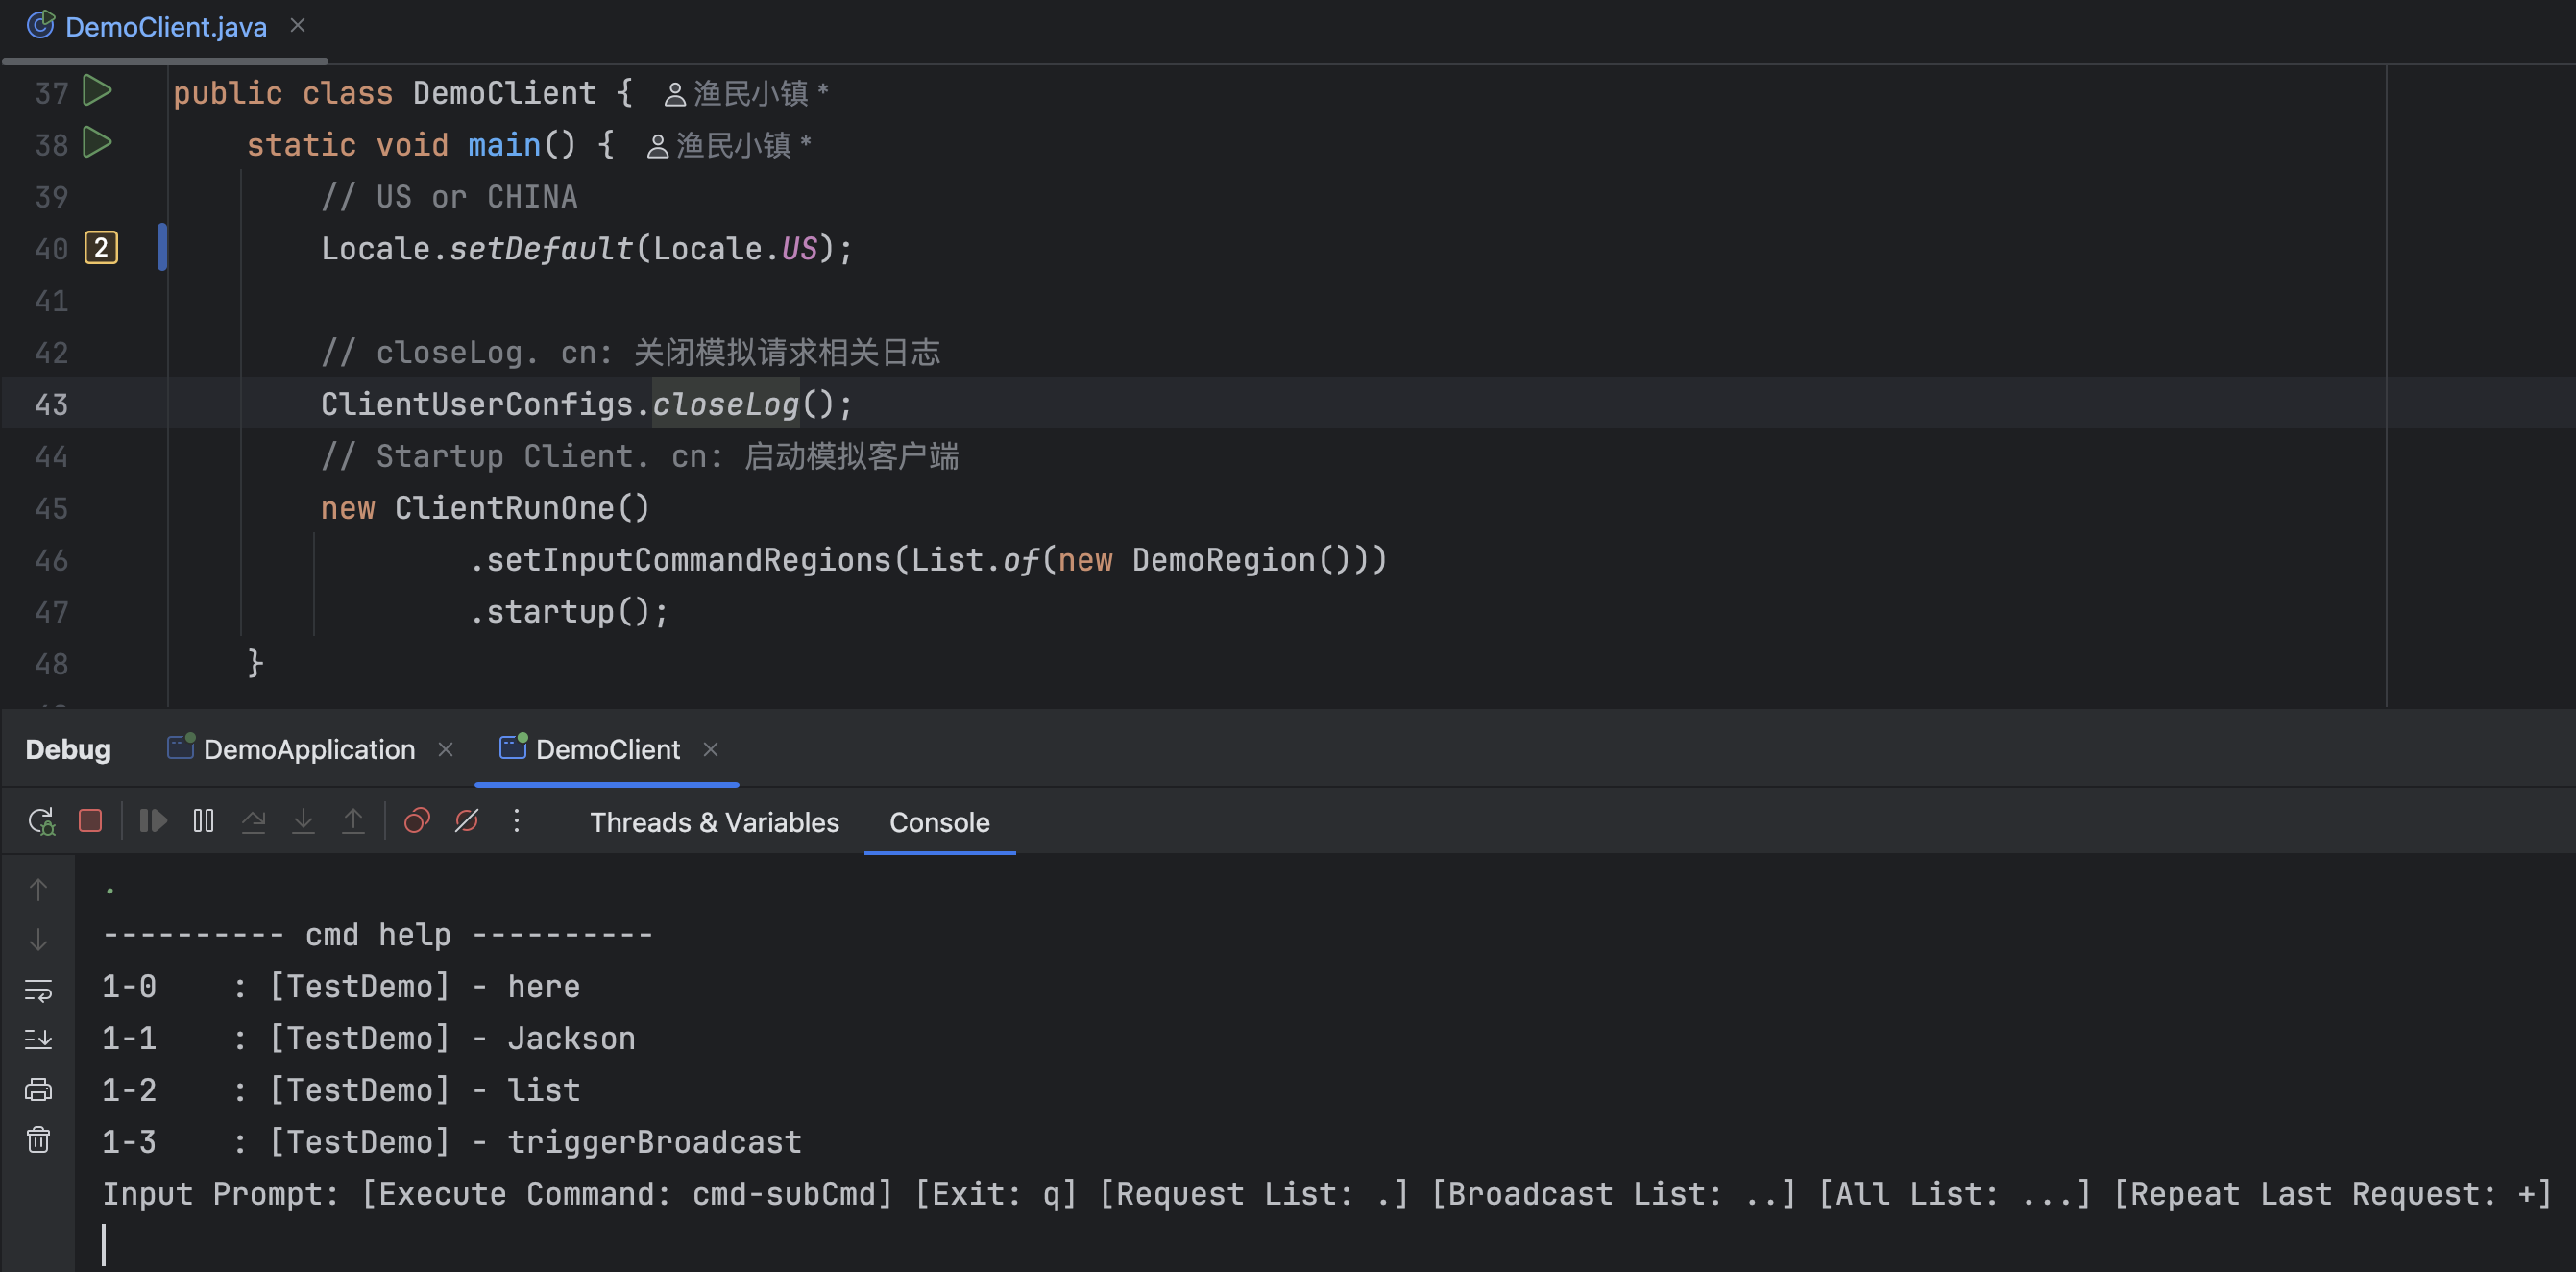
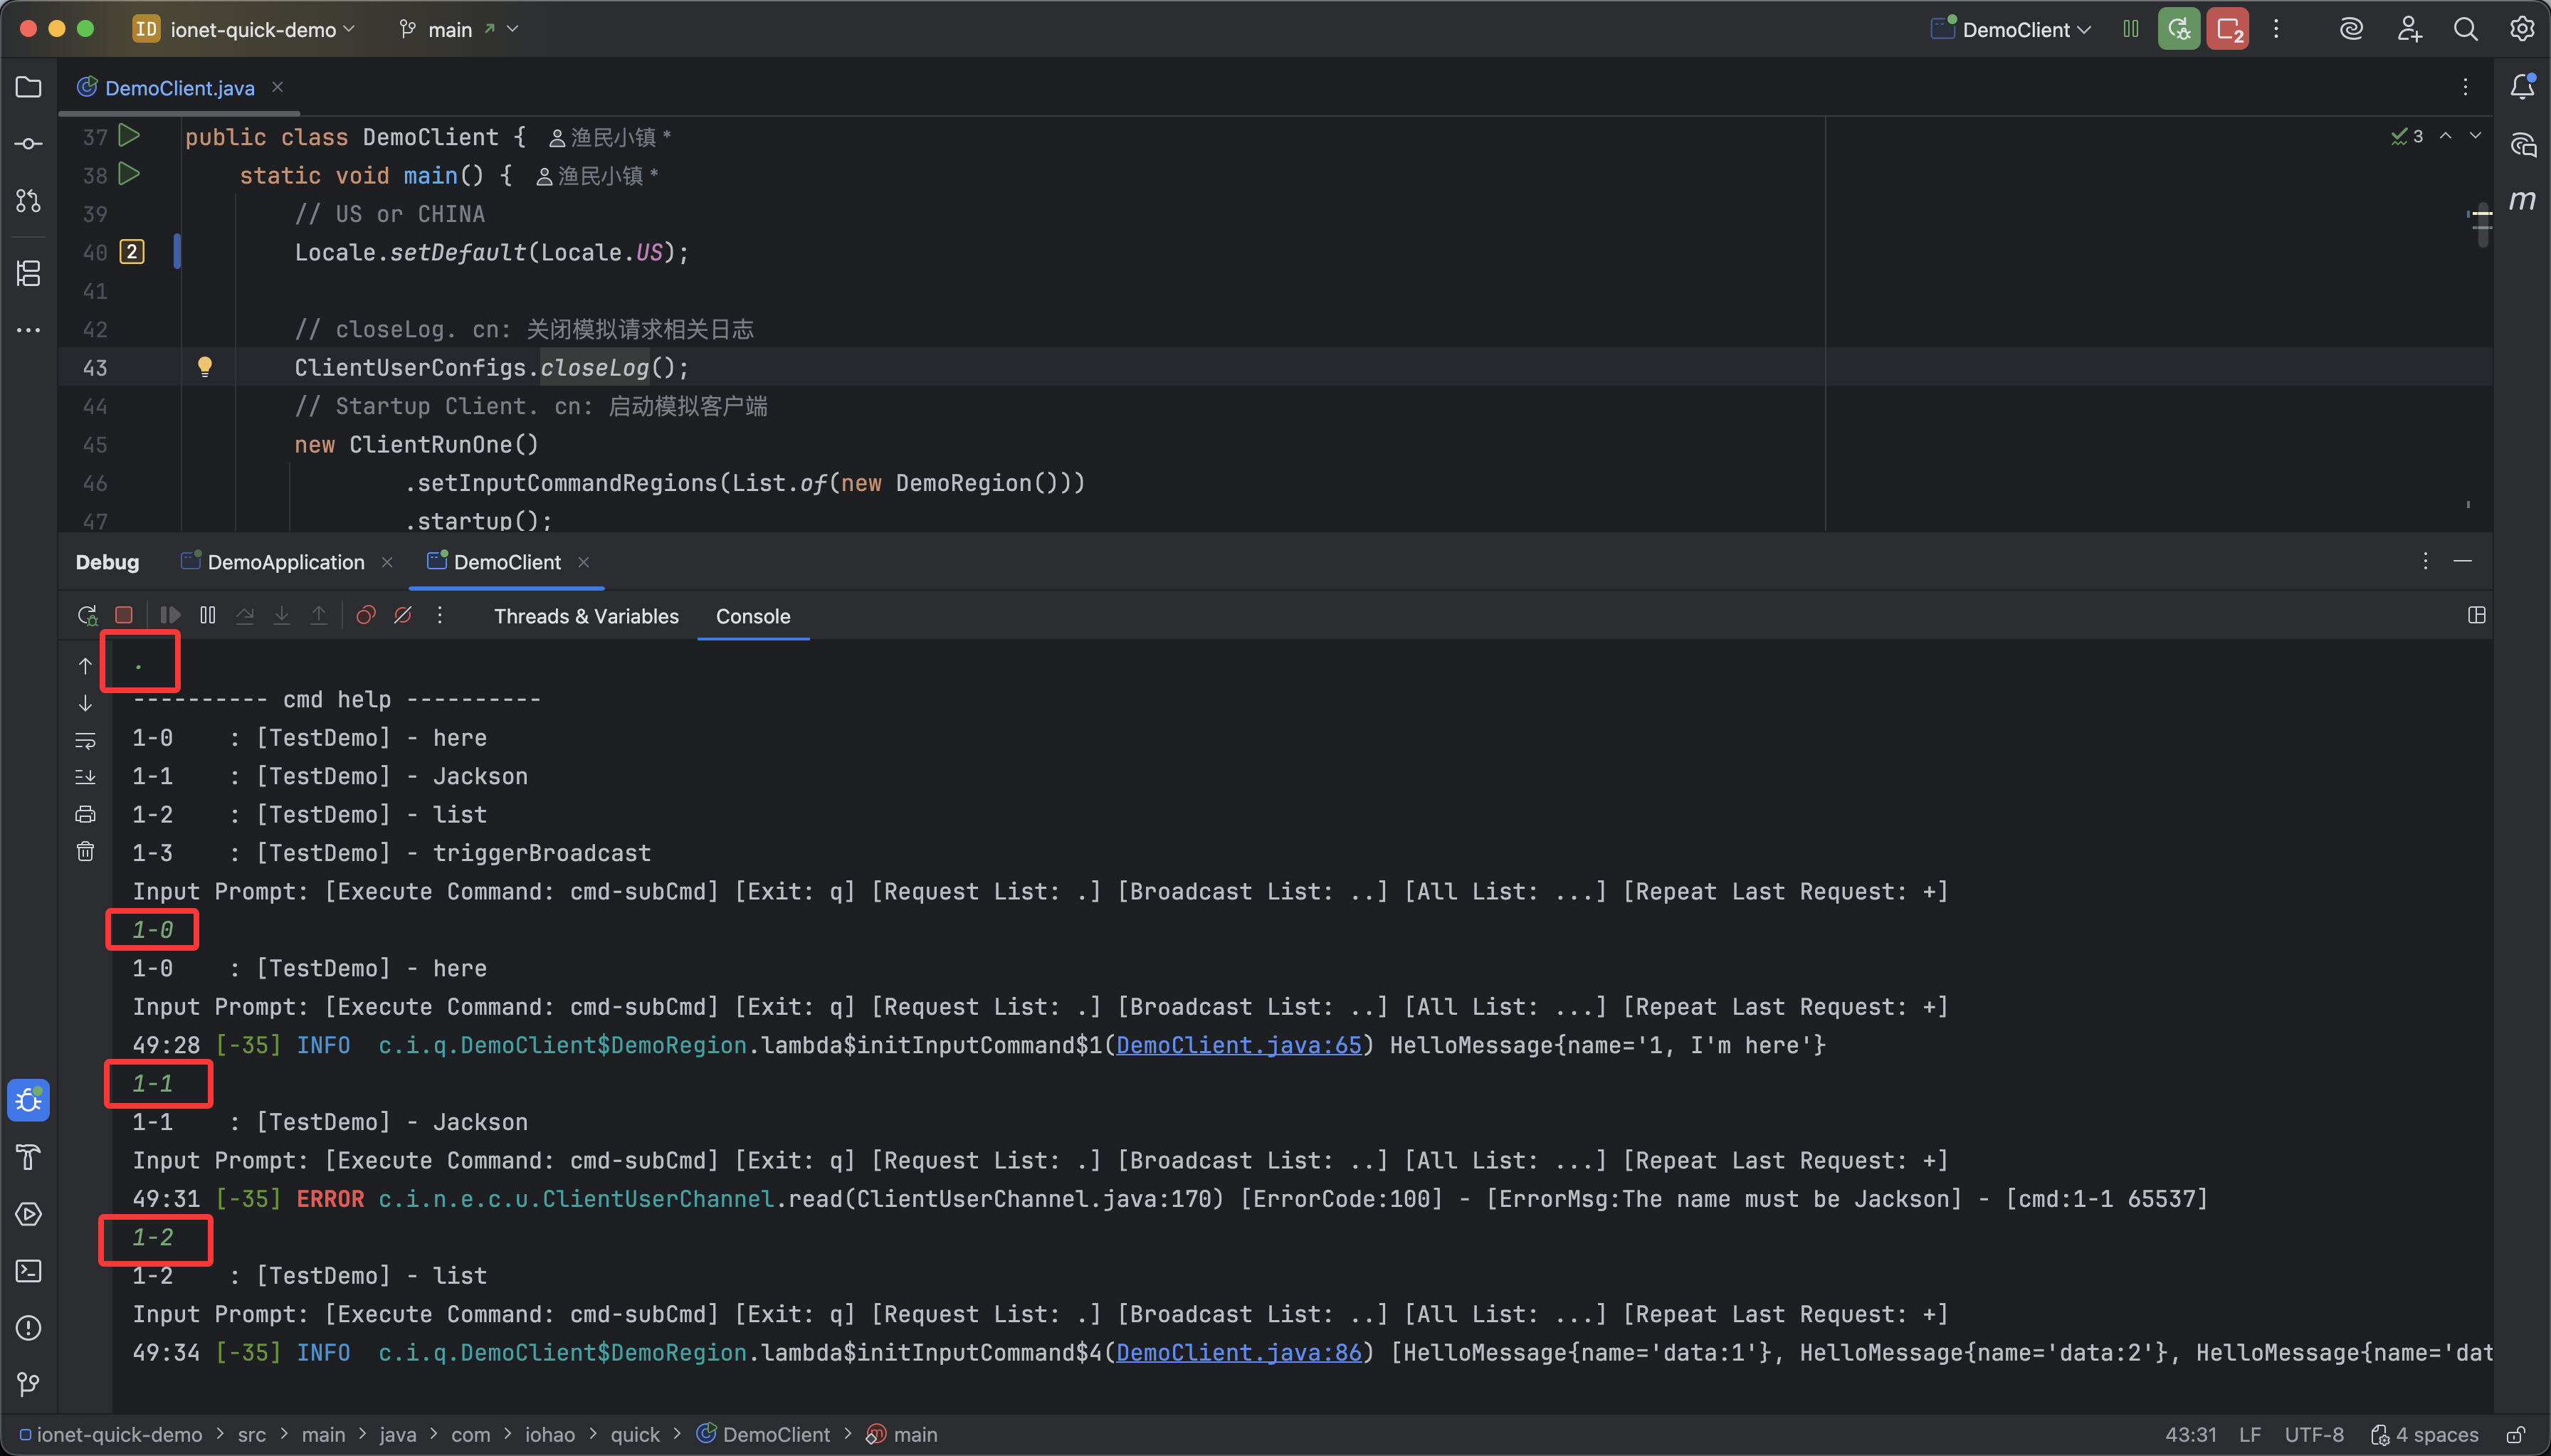
When we input simulated command IDs 1-0, 1-1, 1-2, and 1-3, the framework sends simulated requests to the server.
When the client receives response data from server, it enters corresponding callbacks, as shown below.
You can call simulated commands repeatedly in console. If a business flow needs repeated tests, this is very convenient.
The simulated client and server interact through ExternalMessage,
which is the framework external service protocol.
You can see that when requesting route 1-1, the server responds with an error code.
In the simulated client, ExternalMessage.responseStatus is 100.
This 100 is the error code we defined in business code.
Our jackson method requires name to be "Jackson"; otherwise it throws an exception.
In console, you can see corresponding error code and error message.
Using the exception mechanism provided by the framework keeps business code cleaner.
The framework puts action-thrown error codes into ResponseMessage.responseStatus and passes them to the external service protocol,
then stores them in ExternalMessage.responseStatus.
For more benefits of exception handling, see Exception Mechanism.
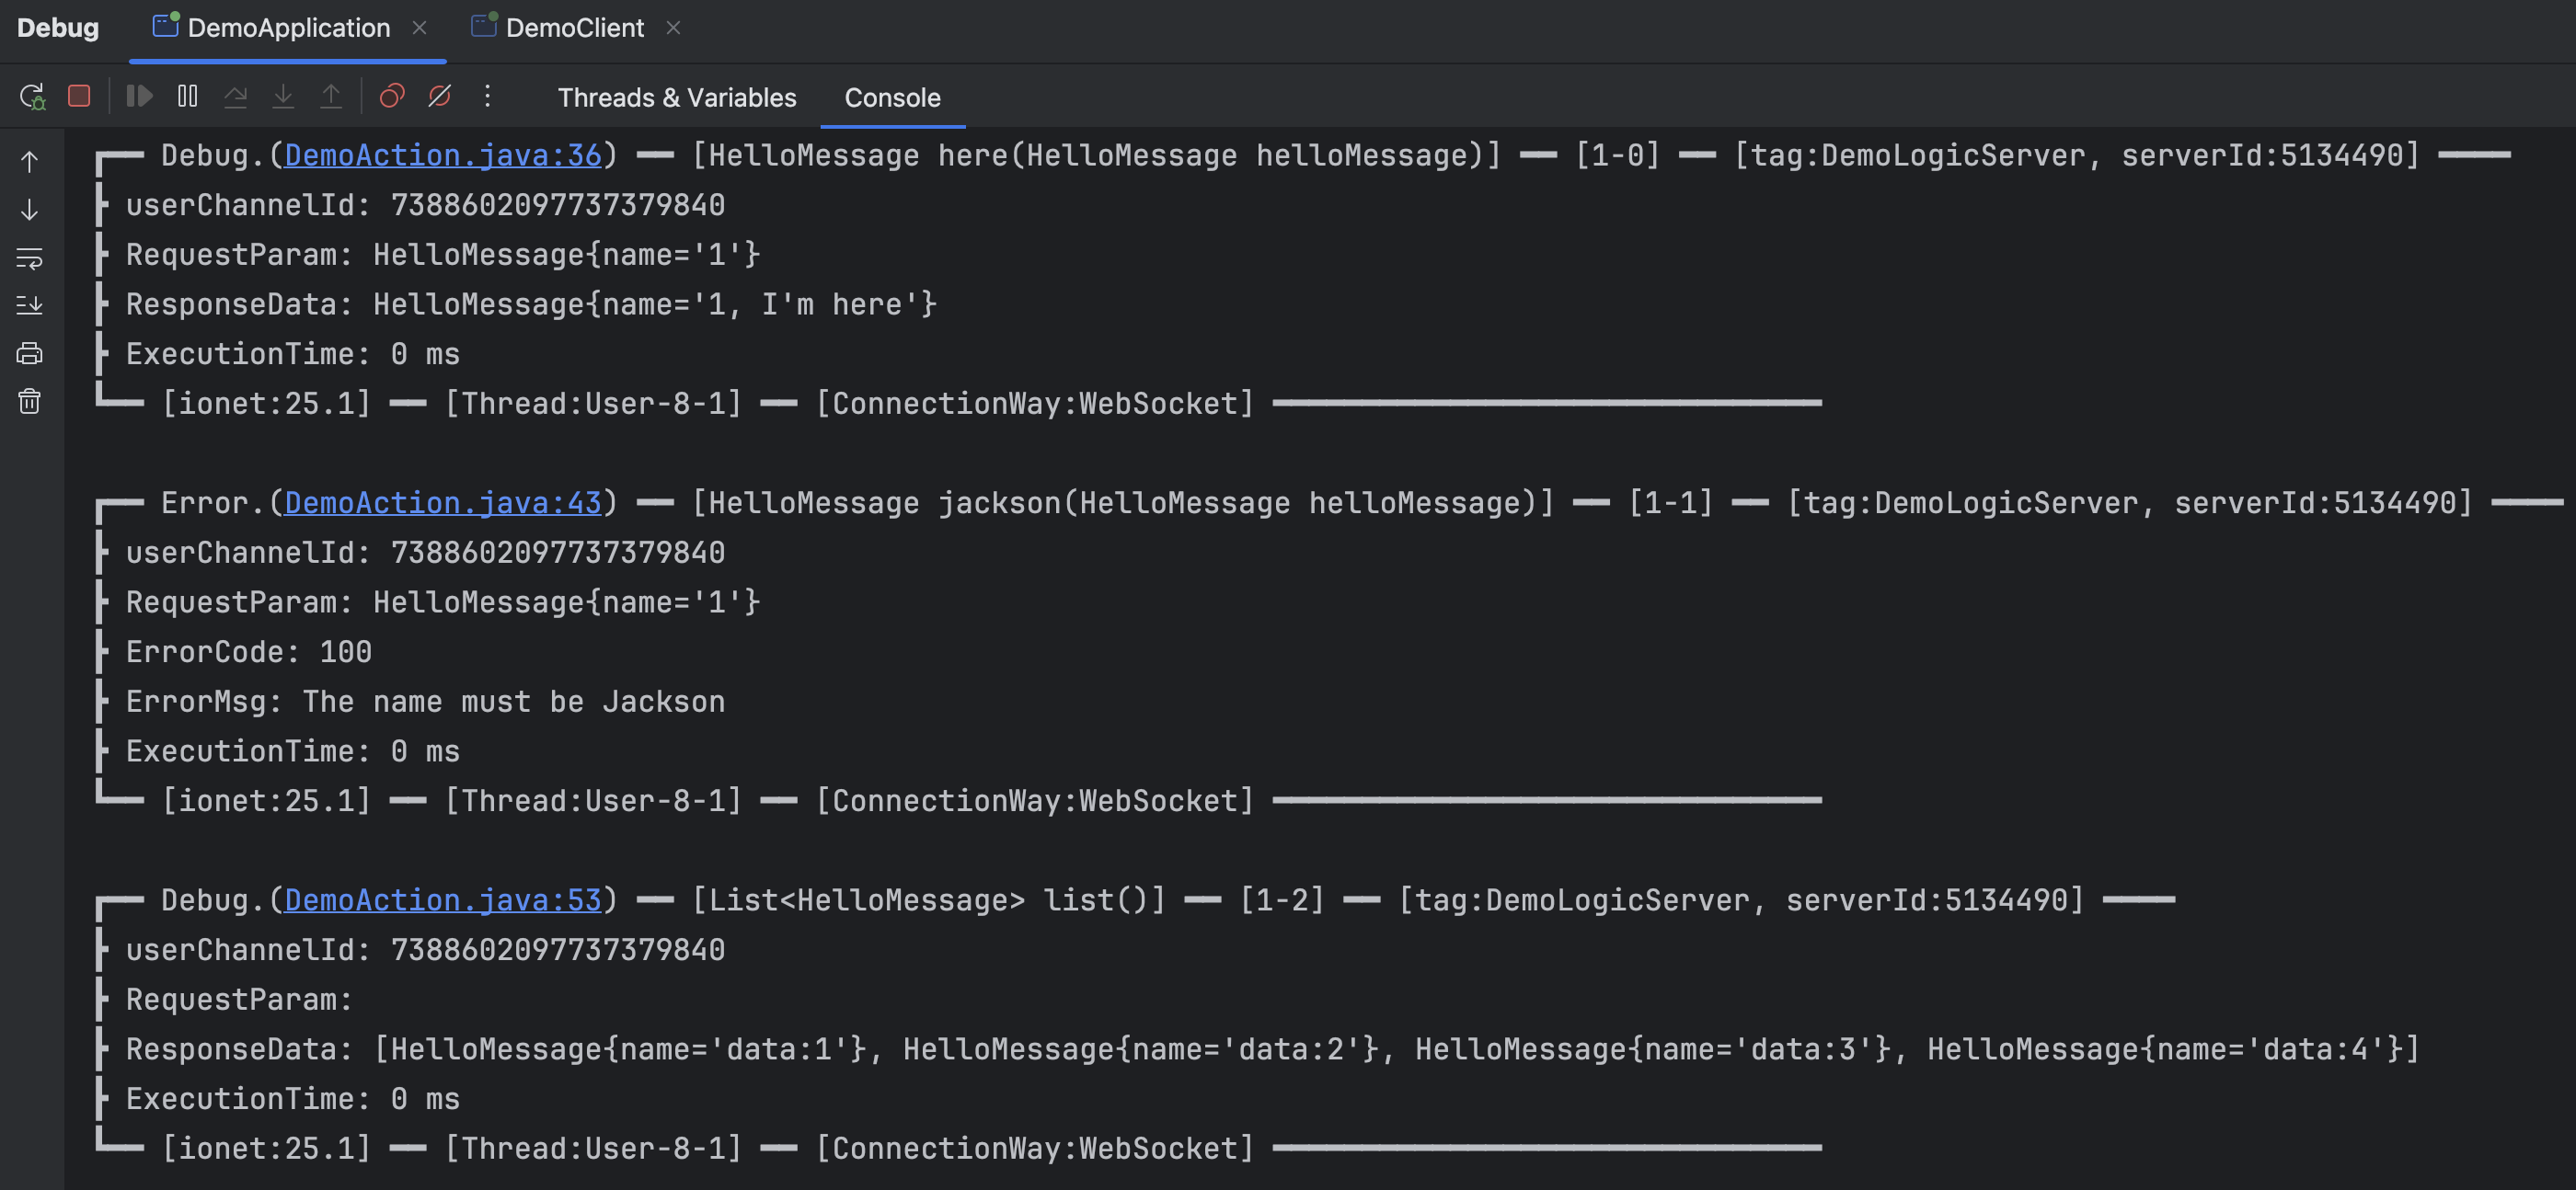
Server Console Output (Important)
One of the top development features: after the client above establishes connection, it sends a message to server, and server console prints logs as follows.
The output is provided by DebugInOut plugin. See related docs for more details.
Summary
With a small amount of code, we completed external service and logic service setup, and simulated a client to access the server we built. We also introduced console information during server startup and action access. These outputs are very important in development and can be considered top-tier developer tooling.
The framework gives developers an excellent development experience, and the server is stable, high-performance, highly scalable, easy to get started with, and distributed.